Tech Guy Questions & Answers
If you need any assistance, we will be happy to help. Please use our Customer Service or Contact Us pages. You may also call 208-455-8433 during regular business hours.
1. Where can I download the Electronic Wiring Schematics or Owner's Manuals?
A. Please click on the PDF file links below for the wiring schematics only. The owner's manuals with wiring diagrams for each model can be found at Owner's Manuals:
2. How difficult is it to install the Wireless Remote Control dump
on the 1600 UT trailer?
A. Installation is pretty easy. Just cut and splice four wires in the trailer's black box and you can enjoy the benefits of Wireless Dumping in a matter of minutes. If you own a model year 2009 trailer, just snap the two connectors together for an instant installation-- no tools necessary.
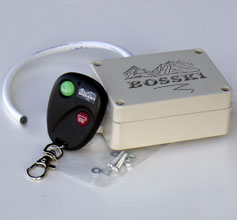
Click below for a step-by-step 'how to' for Part 1865 from Bosski:
Installation Instructions for Wireless Remote Control part 1865
|
 |
3. How do the brakes and brake/tail lights work on the ATV Wagon trailers?
A. Nearly every ATV sold today comes with a dual-element brake/tail light. When you apply the brakes on your quad, that sends a positive electronic signal from the Brake Light Switch to your rear tail/brake light telling the light to turn on the brake light on your ATV. The squeezing of the brake lever or pressing the foot brake turns on the brake light. That same positive signal (hot power source) is transmitted to our Brake Controller mounted on the ATV Wagon which engages the trailer brakes. For the trailer tail light, you simply splice a separate wire into the tail/running light on the quad. It is very simple and easy to wire. For wiring installation, please refer to the owner's manuals for your specific trailer- follow the link on the left. To find the brake and tail light wires on your ATV, please refer to your ATV owner's manual or contact your authorized OEM ATV dealer.
4. I don't have Brake Lights and or a positive Brake Light Switch on my ATV so how do I activate the brakes/brake light on the ATV Wagon?
A. Some ATVs do not have a switch connected to the braking system which activates a hot wire which turns on the brake light, but your tow vehicle can be made to work with our trailer. The following is a list of machines that are not directly compatible with our trailers:
- Late model Bombardier/Can Am ATVs*
- Pre 2005 models of the Honda Rubicon and Honda Foreman
- All Polaris Rangers, including select 2009 and newer Polaris units with LED light systems*
(*Can Am and Polaris owners, please review Q&A # 5 below) |
 |
You will need to purchase a separate Brake/Stop Light Switch and they are available direct from Bosski or your local dealer for hydraulic or drum brakes. You may also need to purchase a T shaped fitting and plumb it into your brake line- purchase varies depending on your specific model and brake line system. Some people refer to Hydraulic Switches as 'Banjo Bolts'. These parts are commonly sold for off-road dual sport motorcycles and cost around $20-30.
- Hydraulic Brake Light Switch, BL992-31CH
from Parts Unlimited
--- 10mm dia x 1.00 mm thread pitch. Fits most Brembo brake master cylinders. Look carefully at your master cylinder for the brand name on your machine.
- Hydraulic Brake Light Switch, Bosski Part # 1860
-- 10mm dia x 1.25 mm thread pitch. Fits most Nissin brake master
cylinders. Also fits most Japanese ATVs including Honda Rubicons and Honda Foremans.
- Universal Stop Light Switch, Bosski Part # 1861
--
This part could be used for older machines that do not have hydraulic brakes. Because it is spring activated, it can be universally adaptable to a wide variety of machines including UTVs, Compact Tractors, ATVs, or Side by Sides.
IMPORTANT: Be sure to check with your OEM dealer to be certain the correct part will work on your machine. Your dealer can also assist you with the wire connections on the ATV in order to safely operate the ATV Wagon trailer.
5. I own a Polaris or Can Am machine and I am having problems wiring the brakes/brake light on the ATV Wagon?
A. We understand most newer models mfg. by Bombardier have a positive ground system where the brake light wire is always on or hot when your ignition is on. This is also true of newer models made by Polaris which use LED light systems. Because of it's unique wiring, it can not activate the ATV Wagon Brake Controller.
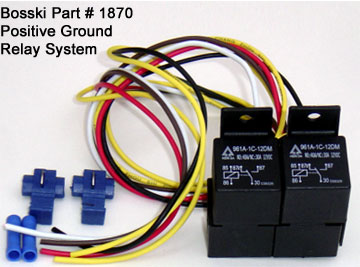
Polaris Rangers, including Polaris models using LED tail lights/brake lights, and late model Can Am / Bombardier quads can easily be made compatible with our trailer braking system by purchasing Part 1870 from Bosski, see photo above. The new Positive Ground Relay System sells for $39.99. See your authorized dealer or order direct from Bosski. Part 1870 works in conjunction with the ATV Side Wiring Harness which comes with a trailer. For installation, please review the Part 1870 Wiring Schematic.
-- Please review the owners manual of your specific quad and or check with your authorized OEM dealer for assistance on finding the Taillight wire and Stop Light wire on the ATV.
--If needed, please see your ATV Wagon Owner's Manual for more information on connecting the ATV Side Wiring Harness. Owner's Manuals
6. How do you adjust the Brake Controller on the 1600 models?
A. ATV Wagon offers power brakes as a standard feature on the 1600 AL and the 1600 UT. Mounted within the black box of the ATV Wagon is a Brake Controller, pictured below, where you can adjust the time delay and intensity of the trailer brakes.
First, make sure power is being supplied to the brake controller by hooking up the 4-pole wire connection to the ATV and turning-on the ATV ignition. Squeeze the Manual Brake Activator and note the red lights appear by the Power Intensity Adjuster. The more lights that activate, the more stopping power you apply to the ATV Wagon brakes.
Move the Power Intensity Adjuster to the Left, towards the (+) positive symbol for more stopping power. Move the adjuster to the Right towards the (-) negative symbol for less stopping power.
The Time Delay Adjuster allows you to place a 1-3 second delay when applying the trailer brakes. Check that the switch is pushed to the back in the opposite direction of the Power On Light.
7. How do you 'manually' adjust the brakes on each brake hub/drum?
A. After reviewing answer 6 above, you may need to manually adjust the brake shoes located within the brake drum, if you still need more or less stopping power.
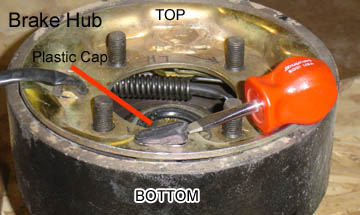
At the bottom, inside portion of each brake hub you will note an elongated plastic cap. Remove this cap as indicated in the photo below:
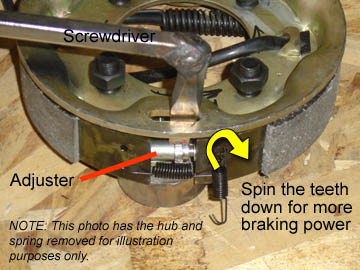
Inside the hole of the hub, you will note a silver adjuster. Insert a screwdriver into the hole, and spin the teeth down to expand or add more stopping power to each hub, as seen below. Spin the teeth up to contract or decrease the brake pads from contacting the brake drum. To clarify, the direction 'down' would be to spin the circular adjuster in a direction towards you. Imagine the adjuster like a coin rolling on a table towards you, that is the direction of 'down'.
After adjusting the brakes, check that the hubs spin freely or a partial drag of the shoes on the drum. Note: If Answers 6 & 7 above fail to increase your stopping power, it is possible your brake shoes are worn out. The changing of brake shoes should only be done by a certified technician.
Finally, if you need any assistance, we will be happy to help. Please use our Customer Service or Contact Us pages. You may also call 208-455-8433 during
regular business hours.
Your ATV Wagon Owner's Manual is very helpful, view them here.
|